

Keep the files in a “Source” folder when deleting duplicate files. Exclude folders from the automatic selection when choosing which duplicates to remove.
Preserve Files in a “Source” Folder when Comparing Two or More Folders for Duplicates
This information applies to:
Fast Duplicate File Finder
Visual Similarity Duplicate Image Finder
Audio Dedupe
The auto-check feature in the duplicate file finder tools automatically selects all except one duplicate file in each group for move/delete. The feature selects the files based on the defined settings like the oldest/newest, largest/smallest files, ones with lower resolutions for images or lower quality for audio files, and so on, but sometimes it is necessary to preserve the files in certain “source” folders and exclude them from the selection. That is quite easy by ticking the checkbox in front of the folder name in the folders list.
If you are comparing folders and you want to keep the files in your “Source” folder it might be more convenient to use “Quick Check” or the context menu options rather than auto-check. You will find more information on that below.
In the folders list tick the ‘Disable Automark For This Folder’ checkbox for the corresponding folder.
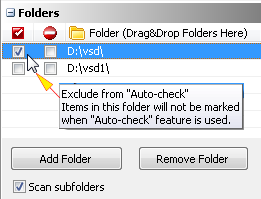
Exclude From Auto-Check (Auto-Mark)
IMPORTANT: Auto-check and Exclude From Autocheck Conflicts
Auto-check will ALWAYS keep at least one file in a group un-checked to preserve at least one unique copy of the listed duplicates in it. As there are many options in the tool that impact the results of the Auto-check feature, it may happen that you have set conflicting options. In such cases, Auto-check might leave more than one file or even all files in a group unchecked.
Here is a simple example:
If you have folder A and B and you have excluded folder A from auto-check. Then you have a duplicate file in each of those folders and the duplicate in folder A has a newer date.
Now if you use the option “Autocheck files with: Newer file dates” the tool will keep both files unchecked. This happens because the folder A is excluded from auto-check and the file in it will not be checked. The file in folder B does not have a newer date so it will be left unchecked too.
The Auto-check feature will always stay on the safe side and will not check files that do not fully match the set options.
Alternative Selection Methods When Comparing Folders for Duplicates
Check All Except Excluded via the Context Menu
As displayed above, excluding folders from “Auto-check” may leave some files unchecked when using certain “Auto-check” rules. When comparing folders it is usually more convenient to use the context menu options or “Quick-check”.
To mark all duplicates that are not in your “Source” folder(s):
- Click the “Uncheck All” button to clear the checked states
- Right-click in the results list and select Check->All Except Excluded
This will mark all the duplicates that are not located in your excluded “Source’ folder(s).
Check Files Using the “Quick Check” Feature

“Quick Check” feature for marking duplicate files automatically.
If you need to do something more sophisticated then you can always use the “Quick Check” option. Please note that “Quick Check” will tick ALL files that match the rules that you have set. If all files in a duplicate group match the rule that you have set then they all will be checked. Nevertheless, you should not worry about deleting all copies. The tool will warn you that you have checked all files in certain groups if you try to use the delete feature. It will display the group IDs and let you cancel the operation and fix the issue.
“Quick Check” is a very powerful feature that you can use to check files based on various rules. Please note that you can combine multiple rules as “Quick Check” does not reset the previously ticked states. If you want to start over, you have to click “Uncheck All” first.
A related article can be found here: Compare Folders For Duplicates – How To Compare “Source” And “Target” Folders
We have designed our tools in a way that they will always try to protect you from deleting important data or all copies of a file. There are numerous warnings, and messages in the applications. Even protection for system files and folders is enabled by default in the setting. Nevertheless, you should always review the results and the marked files carefully before deleting them.
This article also relates to: Autocheck, Automark, Compare Directories Windows 10, Compare Files In Two Folders Windows 10, Compare Folders Mac, Compare Folders Windows 10, Compare Two Directories Linux, Compare Two Folders Windows 10, Compare Two Or More Folders, Exclude A Folder, Exclude Folder, Exclude From Auto-Check, Exlude From Automark, Rsync Exclude Delete, Rsync Exclude Directory Recursively, Rsync Exclude Hidden Files, Rsync Exclude Include, Rsync Exclude Not Working, Rsync Exclude Regex, Rsync Exclude Subdirectory, Rsync Exclude-From, Set A Source Folder, Winmerge Compare Folders, Winmerge Review,
Pingback: How To Compare Two Or More Folders For Duplicates |
Cannot replicate. My files are always autochecked notwithstanding the fact that I have not checked these checkboxes.
Yes they are auto-checked exactly because those boxes are not ticked. Please take a second look at the description.
Pingback: Duplicate File Finder - How to Filter Files and Folders