How to Organize Digital Images and Photos
The issue behind organizing images
Nowadays most users have thousands of images and while organizing few hundred images may not be so difficult it is a headache to organize thousands or even hundreds of thousands photos. Luckily Visual Similarity Duplicate Image Finder (VSDIF) can help with this task. There is a free download available at the product’s web site so you can download and test the tool before placing an order. VSDIF is the best tool for finding duplicate photos.
Quick tutorial on how to organize images (for novice users)
Once you download and install the duplicate image finder all you need to do is to create a new project and add the folders to be scanned.
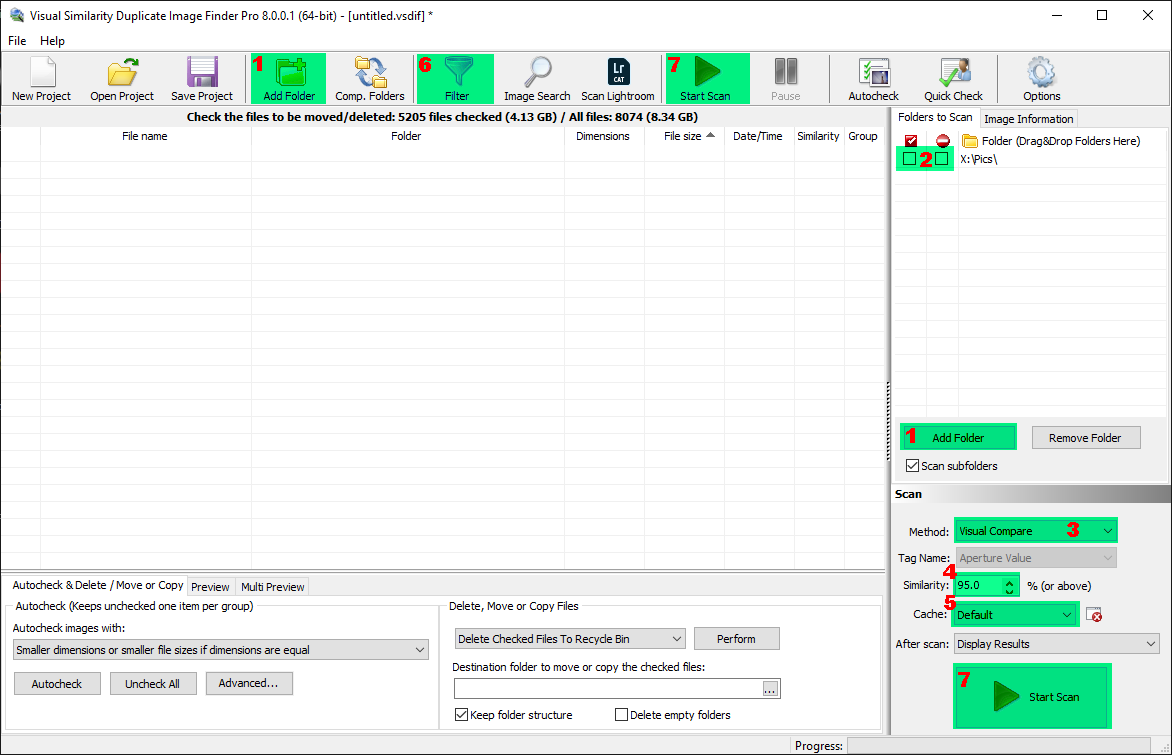
Click the New Project button to create a new project. A dialog box will pop-up automatically where you have to select the folder where the images are located. The selected folder will appear in the folders list panel on the right. If you have photos in different locations just use the “Add Folder” (1) button to add more folders.
Some important notes for novice users:
- Add only the folders with you own photo collections – not your entire drives. If you add your entire drive all the images that are duplicates will be listed. This means that these results will include images also from applications and from the operating system. Some of those images are intentionally duplicated so deleting them may lead to malfunction in your applications or operating system.
Once the folders are added select the scan method.
Find the Exact Duplicate Images First
Before running a “Visual Compare” use the “100% Identical Files” mode. It is much faster and will list exact duplicates.This will help you to quickly get rid of the exact duplicate files and will reduce the amount of images that will be scanned using the slower “Visual Compare” method.
Find Similar Images
The default scan method is “Visual Compare” at 95%. Usually this should work best for you and we do not recommend lowering the value below 90% as it will lead to false positives. The levels below 90% can be used by advanced users for certain special types of scans.
Review Duplicate Image Results
Once the tool completes the scan it will list all similar or duplicate images and group them by similarity. Name, path, properties and similarity are listed for ever image in the duplicates grid. The groups are listed in alternating colors for better readability and the group number that the image belongs to is listed on the right.
Mark Duplicate Images for Deleting
Use the “Auto Check” panel in the bottom left corner to mark files automatically. By default it will mark files with smaller dimension and files size meaning that it will keep the images with the best quality. You can change these settings via the check-boxes and the advanced button in this section. Auto-Check will select all images in a group except ONE – the image that will be kept depends on the above settings.
Some important notes for novice users:
- Always review the results before deleting or use the MOVE option and make a backup before deciding whether to delete the files permanently or not .
There are plenty of shortcuts in VSDIF that will make things easier while reviewing duplicates. You can use Space Bar for example in order to check/un-check an image. Take a look at the help file for complete list of shortcuts.
Delete Duplicate Images
You can delete duplicates manually or automatically. Using the “DEL” key you can delete the currently selected image.
Some important notes for novice users:
- Use the delete functionality inside VSDIF to delete images. If you have scanned some folders and then later manually remove folders or images using Windows Explorer you will get “Not Found” message inside VSDIF for the missing items as they are no longer present at the location that was available during the scan process.
Once you have reviewed the results and marked the images that you want to remove you have several options. You can move the files to a backup folder before deciding whether to delete the permanently or not. The other option is to delete the file to Recycle Bin from where you can restore them if you have deleted something by mistake. The third options is to PERMANENTLY delete the files. You have to be 100% sure before using this option as there is no way of recovering the deleted files.
Final Words:
This is a very basic tutorial on how to get rid of duplicate photos and organize an image collection. You can find an Advanced Tutorial on How To Remove Duplicate Images here.
This article also relates to: Delete Duplicate Images, Find Duplicate Images Windows 7, Find Duplicate Images Windows 8, Find Duplicate Images Windows XP, Find Duplicate Photos Windows 8, Find Duplicate Pictures Windows 7, Find Duplicate Pictures Windows 8, Find Duplicate Pictures Windows XP, Organize Images, Organize Images Windows 7, Organize Images Windows 8, Organize Images Windows XP, Organize Photos, Organize Photos Windows 7, Organize Photos Windows 8, Organize Photos Windows XP, Remove Duplicate Images, Remove Duplicate Photos, Windows 7 Duplicate Image Finder, Windows 7 Duplicate Photo Finder, Windows 8 Duplicate Image Finder, Windows 8 Duplicate Photo Finder, Windows 8 Duplicate Pictures Finder, Windows XP Duplicate Image Finder, Windows XP Duplicate Photo Finder,

